St Albans: 01727 856 869 / Swindon: 07912 351 362

osteopathy

Hey there!

I often get asked the question “when” in two very different ways from my patients, and I want to take a moment to chat about it. The first way comes from a place of acceptance. These are the folks who understand they have an injury and know that with the right information and a solid rehab plan, they’ll be back to their favourite activities in no time. It’s like they’re saying, “I get it, and I’m ready to do what it takes!”

Then there’s the second group, and I totally get where they’re coming from. These patients often ask “when” from a place of panic and despair. They might not have played competitive sports before, but they’re feeling the weight of not being able to join their beloved exercise classes. You can almost see the wheels turning as they negotiate with me about when they can return, creating a whirlwind of anxiety in the process. It’s not uncommon for the first part of our session to be about helping them calm down and find their center.

Now, you might think I lack empathy for these patients, but that couldn’t be further from the truth! Many of them attend these classes for deeply personal reasons, and mental health is often at the top of that list. I completely understand how the panic can set in when they feel like they’re missing out on something that brings them joy and stability.

But here’s the good news: I’m here to help all my patients become pain-free and get back to their chosen activities as soon as possible! Yes, like everyone else, I do have bills to pay, and the longer it takes to heal, the more I might earn. But honestly, that’s not my goal! The quicker you heal and feel great, the more likely you are to share your positive experience with others, and that’s what truly matters to me.

Rehab vs Exercise model

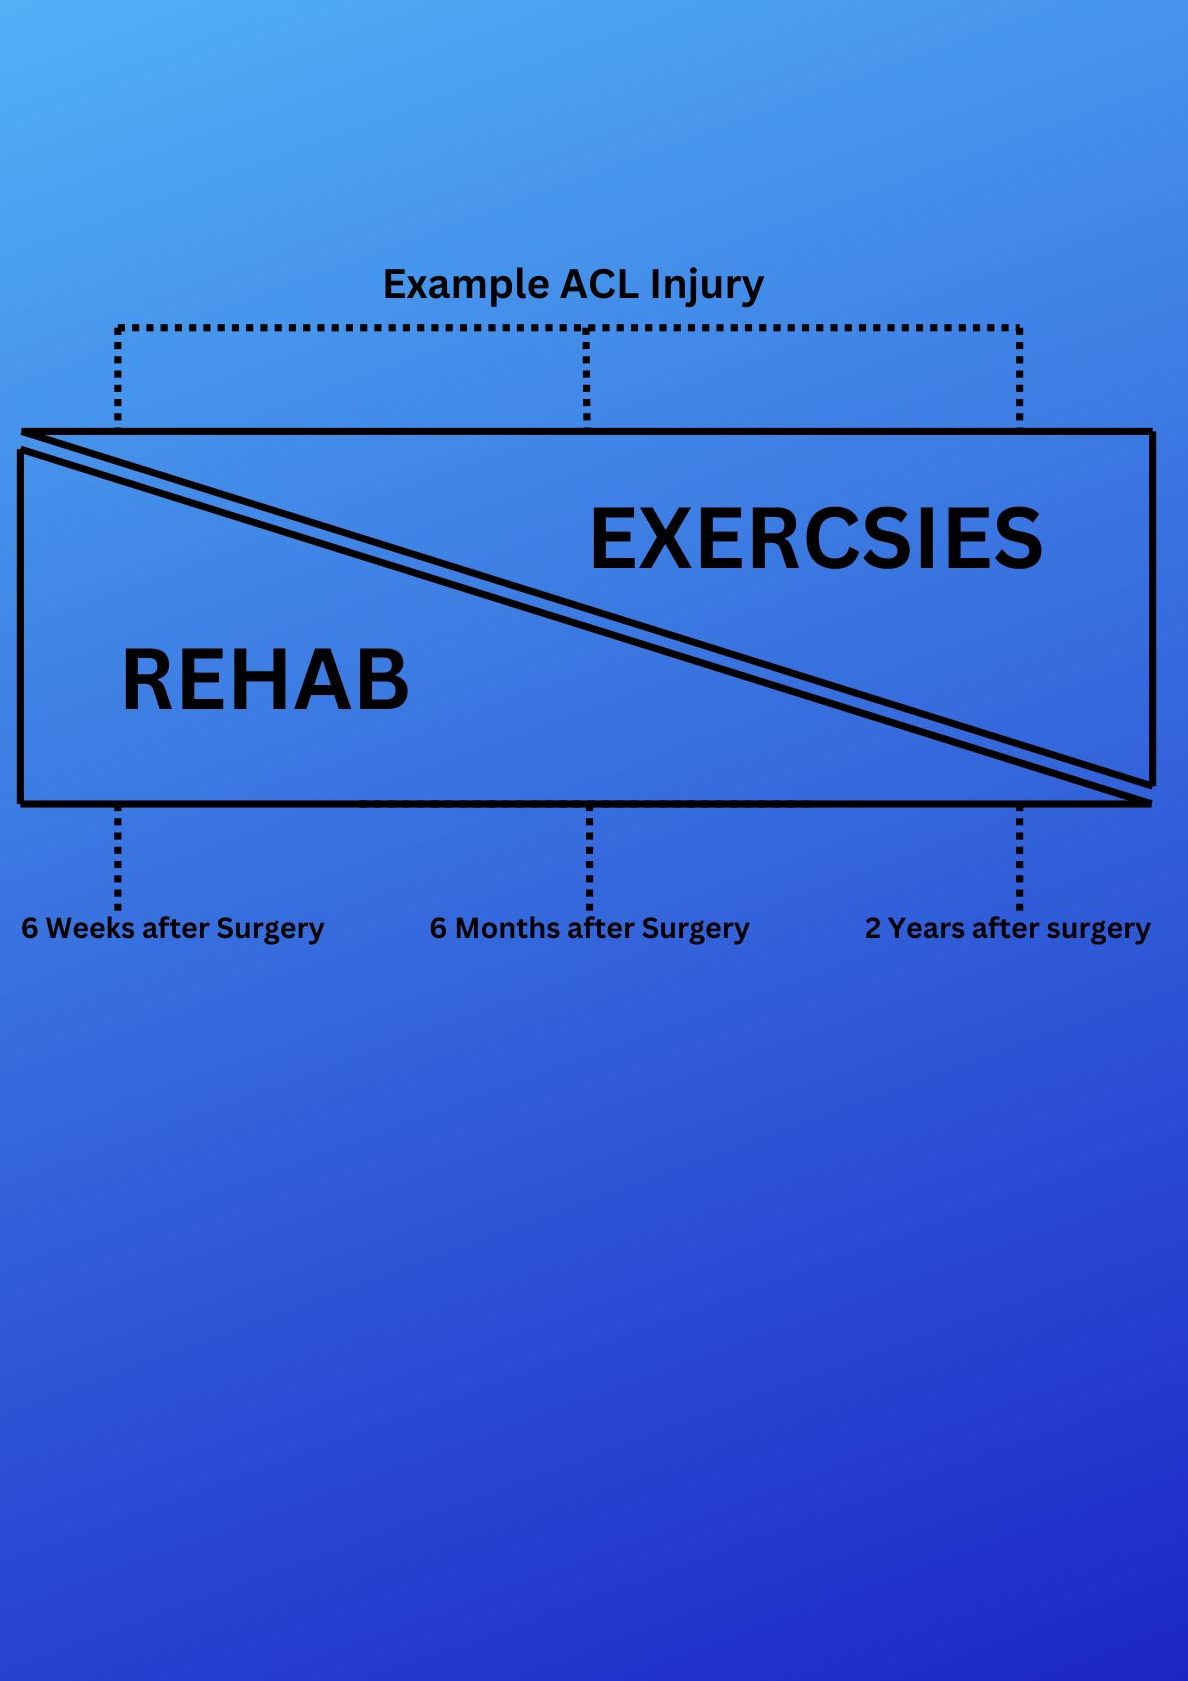
The diagram above illustrates a typical recovery timeline for an ACL injury over a two-year period. It’s important to note that the severity of an injury directly impacts healing time. For instance, while an ACL injury might take up to two years to fully recover, a less severe injury, like a muscle strain, could heal in as little as two months. In fact, many people can return to their workout classes just 2 to 4 weeks after a muscle strain!

The key takeaway here is: don’t despair! We’re all human, and the body has its own natural healing pace depending on the type of injury. While it can be frustrating, the best approach is to accept where you are in your recovery journey, focus on the right rehabilitation exercises, and work towards getting back to your favorite activities as soon as possible. Thanks for taking the time to read this!

Read more

Bicep tendon injuries are not just common; they are a lurking menace for athletes and fitness enthusiasts alike! Whether you’re swinging a tennis racket, diving into a pool, or lifting weights at the gym, the risk of a bicep tendon injury is ever-present. These injuries can range from mild inflammation to catastrophic ruptures, with bicep tendinopathy being a frequent and often misunderstood consequence. In this electrifying exploration, we will delve into the mechanisms behind these injuries, the shocking pathophysiology of bicep tendinopathy, and the most effective rehabilitation strategies that can turn your recovery into a triumphant comeback!

Anatomy and Biomechanics: The Biceps Unveiled

The biceps brachii muscle is a powerhouse with two heads: the long head and the short head. The long head springs from the supraglenoid tubercle of the scapula, traversing the bicipital groove of the humerus, while the short head originates from the coracoid process of the scapula. Together, they form a formidable tendon that inserts on the radial tuberosity of the radius. This muscle is not just for show; it’s the driving force behind elbow flexion, forearm supination, and even shoulder stabilisation! 

Left Bicep Brachii

Mechanisms of Injury: The Hidden Dangers

Bicep tendon injuries can strike when you least expect it, often due to:

  • Repetitive Overhead Movements: Athletes in sports like swimming, tennis, and baseball pitching are particularly vulnerable.
  • Heavy Lifting: Think bicep curls and chin-ups—these exercises can be a double-edged sword!
  • Sudden Forceful Contractions: Imagine catching a heavy object or resisting a sudden elbow extension—ouch!
  • Chronic Overuse: The slow burn of gradual degeneration can sneak up on you, leading to serious consequences.

These mechanisms can unleash a range of injuries, from tendinitis (acute inflammation) to tendinosis (chronic degeneration), partial tears, or even complete ruptures!

Whats actually going on here?

Bicep tendinopathy is a degenerative condition that transforms the tendon into a shadow of its former self. The process unfolds dramatically:

  • 1. Initial Inflammation: Micro-tears in the tendon fibres trigger a fierce inflammatory response.
  • 2. Failed Healing: Inadequate rest or continued stress prevents the tendon from healing properly.
  • 3. Tendon Degeneration: Collagen fibres become disorganised, leading to a tendon that is thickened and less elastic.
  • 4. Neovascularisation: New blood vessels form in typically avascular areas of the tendon, complicating matters.
  • 5. Neural Ingrowth: New nerve endings develop, intensifying pain sensations.

The result? A tendon that is not only weakened but also more susceptible to further injury.

Rehabilitation Strategies: The Road to Recovery

Rehabilitating bicep tendinopathy requires a multifaceted approach that can lead to a triumphant return to activity:

Acute Phase (0-2 weeks):

  • Rest and Activity Modification: Reduce stress on the tendon.
  • Ice Therapy: Manage pain and inflammation effectively.
  • Gentle Range of Motion Exercises: Prevent stiffness without overexerting.
  • NSAIDs: Non-steroidal anti-inflammatory drugs can help manage pain. (Consult a doctor or pharmacist first)

Sub-Acute Phase (2-6 weeks):

  • Progressive Loading Exercises: 
  • Isometric Exercises: Hold contractions without movement.
  • Eccentric Exercises: Focus on the lengthening phase to build strength.
  • Manual Therapy Techniques: Soft tissue and joint mobilisation can work wonders.
  • Modalities: Ultrasound or low-level laser therapy can promote healing.

Remodelling Phase (6-12 weeks):

Progressive Resistance Training: 

  • Concentric and Eccentric Exercises: Target biceps and surrounding muscles.
  • Plyometric Exercises: Boost power and function.
  • Sport-Specific Training: Tailor exercises to your activity of choice.
  • Return to Activity Phase (12+ weeks):
  • Gradual Return to Full Activities: Ease back into your routine.
  • Continued Strengthening and Flexibility Exercises: Maintain your gains.

Education on Proper Technique: Prevent future injuries with knowledge!

Key Principles of Effective Rehabilitation

  • Progressive Loading: Gradually increase the load on the tendon to stimulate healing without overloading.
  • Eccentric Focus: Eccentric exercises are particularly effective for tendinopathies, promoting collagen remodelling.
  • Pain-Guided Approach: Exercises should only cause mild discomfort to avoid further irritation.
  • Addressing Contributing Factors: Correct any biomechanical issues that may contribute to tendon stress.
  • Patience and Consistency: Tendon healing is a slow process—commitment is key!

Advanced Rehabilitation Techniques: Pushing the Boundaries

  • Blood Flow Restriction Training: This innovative technique allows for muscle and tendon adaptation with lower loads, reducing stress on the healing tendon.
  • Instrument-Assisted Soft Tissue Mobilisation (IASTM): Specialised tools can enhance blood flow and promote healing.

Dry Needling: Inserting thin needles into trigger points can alleviate pain and improve function.

Conclusion: The Path to Triumph

Bicep tendon injuries, particularly bicep tendinopathy, demand a comprehensive and patient approach to rehabilitation. We can do this by embracing a structured program that respects the biological healing process, you can transform a potentially debilitating injury into a story of resilience and triumph. Here’s how you can ensure a successful recovery:

  • 1. Commit to the Process: Understand that healing takes time. Stay dedicated to your rehabilitation program and trust the process.
  • 2. Listen to Your Body: Pay attention to pain signals and adjust your activities accordingly. Pushing through pain can lead to setbacks.
  • 3. Work with Professionals: Engage with an Osteopath, sports medicine specialists, and other healthcare providers who can tailor a program to your specific needs.
  • 4. Stay Educated: Learn about proper techniques and body mechanics to prevent future injuries. Knowledge is a powerful tool in maintaining long-term health.
  • 5. Stay Positive and Motivated: Mental resilience is as important as physical strength. Set realistic goals and celebrate small victories along the way.

Following these principles and embracing a holistic approach to recovery, you can not only overcome bicep tendon injuries but also emerge stronger and more knowledgeable. Remember, every setback is an opportunity for a comeback, and with the right mindset and strategy, you can achieve a full and triumphant return to your favourite activities.

Read more

Meniscal injuries are a common type of knee injury that can vary significantly in severity, ranging from minor lesions to complex tears. The treatment approach, including the decision on whether surgery is necessary, depends on the grade, location, and type of meniscal tear. Here’s a detailed breakdown of the grading of meniscal injuries and their repairability:

Grading of Meniscal Injuries

Meniscal injuries are classified into grades based on MRI findings, which help determine the severity and extent of the lesion:

Grade 1 (Mild Lesion)

Description: Small, punctate areas of hyperintensity within the meniscus that do not extend to the articular surface.

Repairability: Typically asymptomatic and do not require surgical intervention. These injuries are often treated conservatively with rest, physical therapy, and anti-inflammatory medications.

Grade 2 (Moderate Lesion)

Description: Linear areas of hyperintensity within the meniscus that still do not extend to the articular surface. Subcategories include:

Grade 2a: Linear signal without reaching the articular surface.

Grade 2b: Signal reaches the articular surface on a single MRI image.

Grade 2c: Wedge-shaped signal without reaching the articular surface.

Repairability: May still be managed conservatively if asymptomatic. If symptoms such as pain or swelling occur, physical therapy focusing on strengthening surrounding muscles is recommended.

Grade 3 (Definite Meniscal Tear)

Description: Hyperintensity extends to at least one articular surface (superior or inferior) on multiple consecutive MRI images, classified as a true meniscal tear.

Repairability: May require surgical intervention if symptoms persist or if there is mechanical instability (e.g., locking or catching of the knee). Surgical options include meniscal repair or partial meniscectomy, depending on the tear’s location and type.

Grade 4 (Complex Tear)

Description: Multiple disruptions in the meniscus with extensive damage to its structure, often involving both superior and inferior surfaces and may include displaced fragments.

Repairability: Often require surgery due to their severity. Repair is feasible if the tear is located in a vascularised region (the “red zone”). If repair is not possible, partial or total meniscectomy may be performed.

Factors Influencing Repairability

The decision to repair a meniscal tear depends on several factors:

Location of Tear

Red Zone: Outer third with good blood supply; tears in this zone have a higher likelihood of healing with repair.

Red-White Zone: Middle third with limited blood supply; repair success depends on individual factors.

White Zone: Inner third with no blood supply; tears in this zone typically cannot heal and are often treated with partial meniscectomy.

Type of Tear

 Longitudinal tears near the red zone are more likely to be repaired successfully.

Complex or radial tears in avascular regions are less likely to heal and may require resection.

Patient Factors

Younger patients with healthy meniscal tissue have better outcomes after repair.

Older patients or those with degenerative changes may require alternative treatments.

Non-Surgical Management

For Grade 1 and Grade 2 injuries or stable tears that do not cause significant symptoms, non-surgical management is often effective:

Rest and Activity Modification: Avoid activities that exacerbate pain or stress the knee joint.

Physical Therapy: Strengthening exercises for quadriceps, hamstrings, and hip muscles to improve knee stability, and range-of-motion exercises to prevent stiffness.

Medications: Nonsteroidal anti-inflammatory drugs (NSAIDs) to reduce pain and swelling.

Bracing: Knee braces may provide additional support during recovery.

Surgical Intervention

Surgery is typically considered for Grade 3 and Grade 4 tears when conservative treatments fail or when there is mechanical instability:

Meniscal Repair: Indicated for longitudinal tears in vascularized zones (red zone). Success rates range from 85–90%, especially when combined with procedures like anterior cruciate ligament (ACL) reconstruction.

Partial Meniscectomy: Involves removing damaged portions of the meniscus while preserving as much healthy tissue as possible. Often performed for complex tears in avascular zones.

Total Meniscectomy: Rarely performed due to long-term risks of osteoarthritis. Reserved for cases where no other surgical options are viable.

Meniscal injuries range from mild lesions (Grade 1) to complex tears (Grade 4). While Grades 1 and 2 are typically managed conservatively without surgery, Grades 3 and 4 often require surgical intervention depending on factors such as tear location, type, and patient characteristics. Early diagnosis and appropriate treatment are crucial for preserving knee function and preventing long-term complications such as osteoarthritis.

Grades of Tears
Read more

The slipped disc

As many of you are aware, the disc does not slip as it is often thought of as a hockey puck. As the diagram shows, it is the gel like centre that protrudes out, which causes the discomfort as it irritates the nerve.


It is said that 80% of the worlds adult population have a disc bulge of sorts but are asymptomatic.

For those of you that have nerve pain as a result of a disc pathology then you have my up most sympathy, but even the symptoms differ from general morning stiffness to not being able to move.

A typical presentation of a disc pathology are usually to be stiffer in the morning (More than 1 hour) than during the day.

This is because the disc hydrates when we are sleeping and so there is more pressure placed on the bulge itself. When the disc shrinks through out the day, there is less pressure on the bulge. Equally, we are able to displace swelling when moving.

The Disc debate.

Often we see people that have been diagnosed, usually by an MRI, that they have a disc pathology. They have been told that the pain is from the disc pressing on a nerve.

In Clinic.

There have been many times where the person has had a disc issue, but the pain is not a direct result of that disc. For example, if you have an L5 disc herniation presenting with pins and needles or shooting pain in the front of your foot and shin, this is usual as this is where the sensory part of L5 goes to. See dermatome map.

Dermatome Map.

If you come to the clinic presenting with pain in the front of the thigh, having a disc issue at L5, the L5 disc maybe the overall cause, but its not directly causing the thigh pain. As you can see by the dermatome map.

Even if you have lower back pain, with no other symptoms and you happen to have an MRI showing you that you have a disc bulge, we cannot be completely sure that the disc is actually the problem.

Think of it this way, you only have test (mechanically speaking) when there are symptoms. For all we know you could have had that L5 disc bulge for a year or more.

What to do.

In any case, you have to keep moving and try to re-establish balance and movement in your body. The more you allow your body to become stiff, the more pain you will feel. There is no limit to the movement you should try, but always keep inside the remit of what you can do, as the body has a way of fighting back!

Read more

It’s alway struck me as funny when I hear that people believe that it is acceptable to suffer with lower back pain. When people are in pain and discomfort it seems to chip away at their logic and reasoning. This is usual as the sensation of acute pain is the only thing you can think of and if not acute you certainly are reminded of it more than once in a day. 

I’m here to tell you that you don’t have to be like that. Let’s get you moving and into a better standard of living where pain does not rule over you like a tyrant. Demanding that you succumb to its way of thinking, making you hold back on living your life freely without discomfort. 

Let us reconnect your brain with your body and your body to the outside world without hesitation or fear. Let’s start living and get rid of this feeling of having to manage week after week and month after month with pain and discomfort. 

Sciatica.

I see people every day complaining that they have sciatica, and sure some of the are right. Sciatica is a pain with either pins and needles, numbness or weakness down the back of the leg caused by a problem in the lower back.

The site of pain runs along with the sciatic nerve, which starts in the lower back (spine) into the buttocks, down the back of the leg to behind the knee, turns to the outside of your shin then finishes at the big toe.

Now, if you are experiencing pain, or any symptoms that are present at the inside, outside or front of the thigh, this is not sciatica. These other symptoms could be caused by altered mechanics due to sciatica or simply be from irritation from another source other than the sciatic nerve. 

Movement patterns. 

There are many reasons that you cold have back pain, but to have prolonged back pain is usually directed to you not moving. The catch 22: you need to move to get rid of the pain but when you move you get pain. 

Let’s try and reestablish your missing movement patterns within the remits of your dysfunction, which you can do safely and without pain.

Movement Prep.

Do this exercise in the comfort of your own home and preferably by yourself as you’re going to look a bit foolish. 

If you have one, stand in fort of a mirror. 

Try to allow your feet to relax and withstand the need to force your feet militarily parallel. 

Breath into your tummy, this will help you relax your shoulders. Have a slight bend in your knees and keep your knees still. Then try and feel the force of the floor pushing against the soles of your feet.

The movement.

Try and rock you pelvis backwards and forwards, while keeping your upper body still, maintaining a slight bend in your knees. As your bottom sticks out you are lengthening the abdomen and as your bottom tucks underneath you, you feel a lengthening in the base of your back.

Once you have the hang of this we will implement the rib cage in time with the pelvis. As your bottom sticks out (still with a slight bend of the knees) squeeze your shoulder blades together. You will notice that your chest will lift up, and the should feel a greater lengthening in your abdomen.

Then, tuck your bottom underneath you and allow both your shoulders to push forward (at this point ensure you are not bending forward from your hips and waist). You will notice that your chest will sink, and the should feel a greater lengthening in your back..

There is more to come with this exercise, but try this for 1 minute 3 times a day and see how you feel over the next week. Then we can add in some more funky stuff. 

Read more